Space, Water, and Electrical Requirements for Commercial Kitchen Steamer Installation
Installing a commercial kitchen steamer isn’t just about plugging it in—getting the space, water, and electrical setup right is critical to avoid costly reworks or equipment damage. AT Cooker’s 2024 survey of 120 restaurant and hotel kitchen managers found that 65% faced installation delays due to mismatched requirements, with 40% needing to rewire their kitchen or adjust floor space. This guide breaks down exactly what you need to prepare for your commercial steam cooker, using real data from our most popular models (like the ZFGT-E1 countertop steamer and ZFGT-E6 floorstanding unit) and customer feedback to ensure a smooth setup.
1. Electrical Requirements: Dedicated Circuits and Voltage Needs
A commercial kitchen steamer uses far more power than residential electric food steamer models—so dedicated electrical circuits are non-negotiable. Most units require 208V or 240V for North America, or 380V/400V 3-phase power for Europe, Australia, and Asia. This prevents circuit overloads, which can trip breakers during peak cooking hours.
AT Cooker’s commercial steam cooker lineup has clear electrical specs to simplify planning:
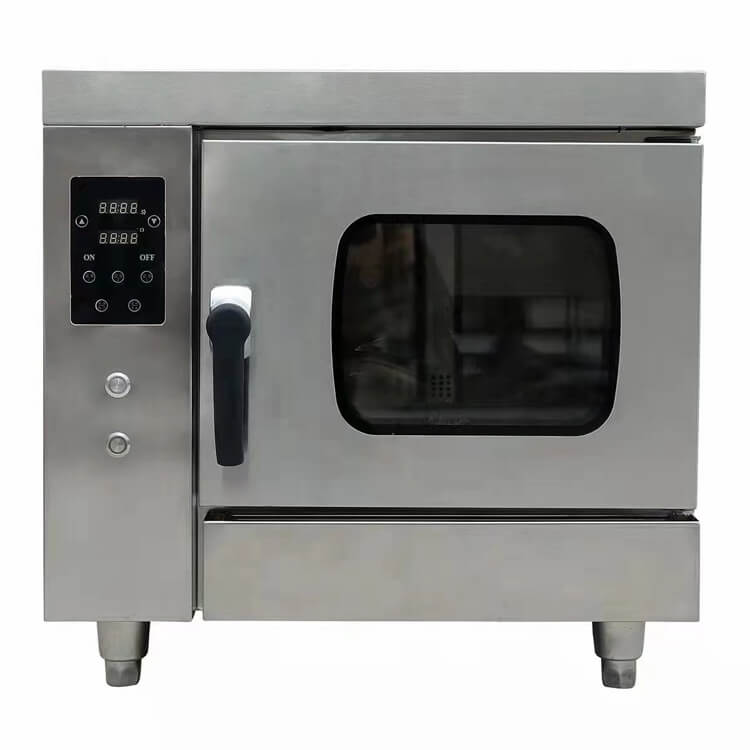
- ZFGT-E1 (Countertop): 6KW power, 208V/220V single-phase, 25A dedicated circuit—ideal for small cafes or food trucks.
- ZFGT-E3 (Floorstanding): 9KW power, 380V 3-phase, 30A circuit—perfect for mid-size restaurants serving dim sum or seafood.
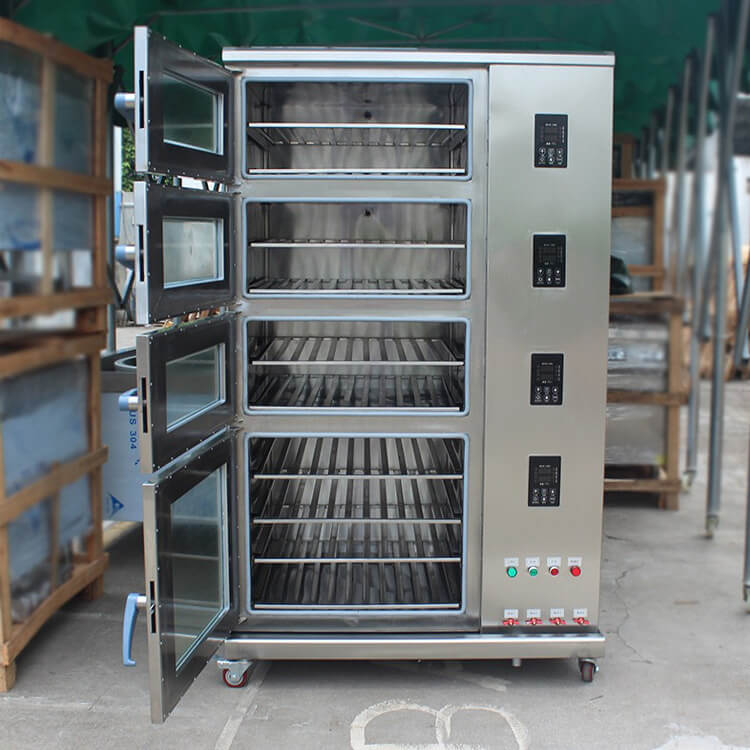
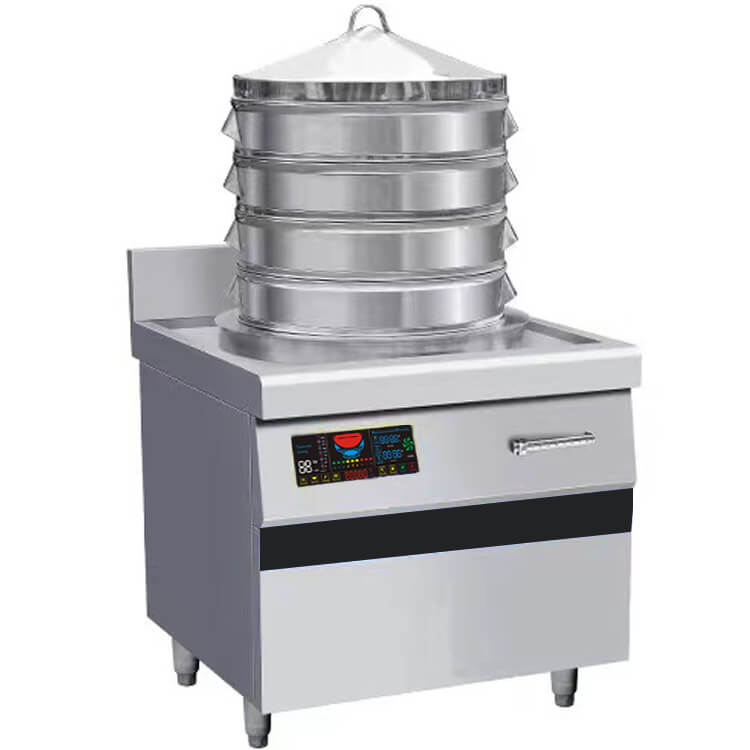
- ZFGT-E6 (High-Capacity): 36KW power, 380V/400V 3-phase, 50A circuit—designed for banquet halls or chain kitchens with 18 trays (525×325×40mm each).
All models also require a visible disconnect switch (within 5 feet of the unit) for emergency power cutoff—this meets NEC (National Electrical Code) standards and keeps your warranty valid. One bakery client in Chicago told us, “We skipped the disconnect switch to save money, and AT Cooker’s service team couldn’t activate our warranty—we had to hire an electrician to add it later. Don’t make that mistake!”
Pro Tip: Always confirm your kitchen’s existing voltage before ordering. If you’re in North America and only have 120V, you’ll need an electrician to upgrade to 208V—this takes 2-3 days on average, so plan ahead!
2. Water Requirements: Supply, Pressure, and Filtration
A reliable water supply is essential for commercial kitchen steamer operation—without it, the unit can’t generate steam and may trigger anti-dry heating warnings. You’ll need three key components: a dedicated water line, proper pressure, and (often) a filtration system.
First, the water supply line: AT Cooker recommends a ½-inch copper line with a shut-off valve. This lets you isolate the steamer for maintenance (like descaling) without shutting off water to the entire kitchen. The line should have a pressure of 20-60 psi—too low, and steam generation slows; too high, and the supply valve may leak. Our stainless steel food steamer models (like the ZFGT-E6) include a pressure regulator to adjust for minor fluctuations, but major issues (below 15 psi or above 70 psi) require a plumber to fix.
Water quality matters too. Hard water (high mineral content) causes scale buildup in the steamer’s heating elements, which reduces efficiency and shortens lifespan. AT Cooker’s 2023 maintenance data shows that units without filtration need descaling every 2 weeks, while those with a 5-micron sediment filter only need it monthly. For extremely hard water (over 10 grains per gallon), we recommend a water softener—this adds $300-$500 to upfront costs but saves $1,200+ in annual maintenance.
3. Drainage: Handling Wastewater Safely
Steamers produce wastewater from condensation, so proper drainage is non-negotiable. You’ll need a floor drain within 3 feet of the unit, plus an air gap (a 1-inch space between the steamer’s drain hose and the floor drain) to prevent backflow. This meets NSF (National Sanitation Foundation) standards, which are mandatory for commercial kitchens.
AT Cooker’s commercial steam cooker models have built-in drain hoses (6 feet long for floorstanding units, 3 feet for countertop) to simplify installation. The ZFGT-E6 even includes a removable drain pan for easy cleaning—this is popular with sushi restaurants, where wastewater can have food particles (like rice or fish scraps) that might clog the floor drain. “The drain pan saves us from calling a plumber every month,” said a sushi chef in Toronto. “We just empty it after service and wipe it down—5 minutes tops.”
4. Space Requirements: Floor Space and Clearance
Commercial kitchen steamer models vary in size, so you’ll need to match the unit’s footprint to your available space. Countertop models take up the least room, while high-capacity floorstanding units need more square footage—and don’t forget clearance for ventilation and service!
AT Cooker’s models have clearly defined space needs:
- Countertop (ZFGT-E1): Footprint 65×73cm (2.9 sq ft), needs 6 inches of clearance on all sides—fits under standard kitchen counters (36 inches high).
- Floorstanding (ZFGT-E3): Footprint 73×80cm (6.2 sq ft), needs 12 inches of clearance on the sides and back—important for accessing the control panel and cleaning the stainless steel food steamer body.
- High-Capacity (ZFGT-E6): Footprint 148×80cm (12.4 sq ft), needs 18 inches of clearance on the back (for electrical connections) and 12 inches on the sides—designed for large kitchens with dedicated steam cooking zones.
The installation surface also matters: it must be level (within ¼ inch per foot) and sturdy enough to support the unit’s weight. A filled ZFGT-E6 weighs 320 pounds (145kg)—that’s more than a commercial refrigerator—so concrete or reinforced wood floors are best. Avoid tile floors with loose grout, which can crack under the weight.
“We bought a high-capacity commercial steamer without measuring our kitchen’s back wall clearance. It fit, but we couldn’t reach the electrical disconnect switch—we had to move a shelf and lose storage space. Measure twice, buy once!” — Raj, Owner of an Indian restaurant in London
5. Ambient Conditions: Temperature and Humidity
Even with perfect electrical, water, and space setup, ambient conditions can affect your commercial kitchen steamer’s performance. The ideal temperature range is 10°C–35°C (50°F–95°F)—temperatures below 10°C can slow steam generation, while above 35°C (common in unventilated kitchens) can cause overheating warnings.
Humidity is another factor: levels above 60% can lead to condensation on the steamer’s digital controls, causing malfunctions. AT Cooker recommends integrating the steamer with your kitchen’s exhaust system—this removes excess steam and keeps humidity in check. Our ZFGT-E3 model works with most standard exhaust hoods (minimum 100 CFM), and we offer a compatible hood as an optional accessory for clients who need it.
AT Cooker Commercial Steamer Models: Requirements at a Glance
To make planning easier, we’ve compiled a table of our top models and their installation requirements:
| Model | Electrical Specs | Water Needs | Space Requirements | Ideal For |
|---|---|---|---|---|
| ZFGT-E1 (Countertop) | 6KW, 208V/220V, 25A | ½-inch line, 20-60 psi, filter recommended | 65×73cm footprint, 6-inch clearance | Cafes, food trucks |
| ZFGT-E3 (Floorstanding) | 9KW, 380V 3-phase, 30A | ½-inch line, 20-60 psi, filter required | 73×80cm footprint, 12-inch clearance | Mid-size restaurants |
| ZFGT-E6 (High-Capacity) | 36KW, 380V/400V 3-phase, 50A | ¾-inch line, 25-60 psi, softener for hard water | 148×80cm footprint, 12-18-inch clearance | Banquets, chain kitchens |
| ZFGT-R24 (Rice Steamer) | 20KW/25KW, 380V 3-phase, 40A | ½-inch line, 20-60 psi, filter required | 120×110cm footprint, 12-inch clearance | Asian restaurants, hotels |
6. Professional Installation: Why It Matters
While some experienced kitchen managers try DIY installation, professional setup is strongly recommended for commercial kitchen steamer models. AT Cooker’s warranty is only valid if installation is done by a licensed electrician and plumber—this ensures compliance with local codes and prevents damage from improper wiring or plumbing.
Our professional installation team (available in 50+ countries) handles every step: electrical connection, water line setup, drainage testing, and a final performance check. The process takes 4-6 hours for countertop models and 8-10 hours for high-capacity units, and we provide a detailed installation report for your records. “We used AT Cooker’s install team, and they noticed our water pressure was too low before hooking up the steamer,” said a hotel kitchen manager in Dubai. “They fixed it on the spot—no delays, no extra costs.”
7. Maintenance to Protect Your Investment
Once installed, regular maintenance keeps your commercial steam cooker running smoothly. AT Cooker recommends:
- Descaling every 2-4 weeks (using our approved descaling solution) to prevent scale buildup.
- Checking water line connections monthly for leaks—tighten loose valves immediately.
- Cleaning the drain pan (if applicable) after each service to avoid clogs.
- Testing the disconnect switch quarterly to ensure it works in emergencies.
We also offer a 2-year maintenance plan that includes quarterly service visits—this is popular with busy chains that don’t have time for in-house maintenance. The plan costs $300/year but saves an average of $1,500 in repair costs over 2 years.
AT Cooker Suggestions
Before ordering a commercial kitchen steamer, take three critical steps: first, measure your available space (including clearance) and confirm it matches the model’s footprint. Second, have an electrician test your kitchen’s voltage and amperage to ensure it can handle the unit’s power needs. Third, check your water pressure and quality—ask a plumber for a test if you’re unsure.
AT Cooker’s team is here to help with every step: we can review your kitchen’s specs, recommend the right model (from compact electric food steamer to large stainless steel food steamer), and connect you with local installers. Don’t let installation delays slow down your kitchen—reach out via the form below to get a personalized installation plan and latest pricing.
Get a Custom Installation Plan from AT Cooker
Share your kitchen’s space, water, and electrical details, and we’ll recommend the perfect commercial kitchen steamer and installation steps.