Induction Stove and Oven: Dimensions & Installation Requirements
For commercial kitchen owners—whether running a busy bistro, hotel, or catering business—getting the induction stove and oven dimensions right is make-or-break for space efficiency. AT Cooker’s 2024 survey of 150 restaurant operators found that 62% of installation delays came from mismatched countertop space or electrical setups, and 38% had to rearrange their kitchen layout after buying the wrong-sized unit. This guide breaks down the exact dimensions of AT Cooker’s BZT-AZH4FO commercial induction hob and oven (our top-selling induction cooker and oven combo) and all installation requirements—from electrical circuits to ventilation—backed by real customer feedback and our 20 years of commercial kitchen expertise.
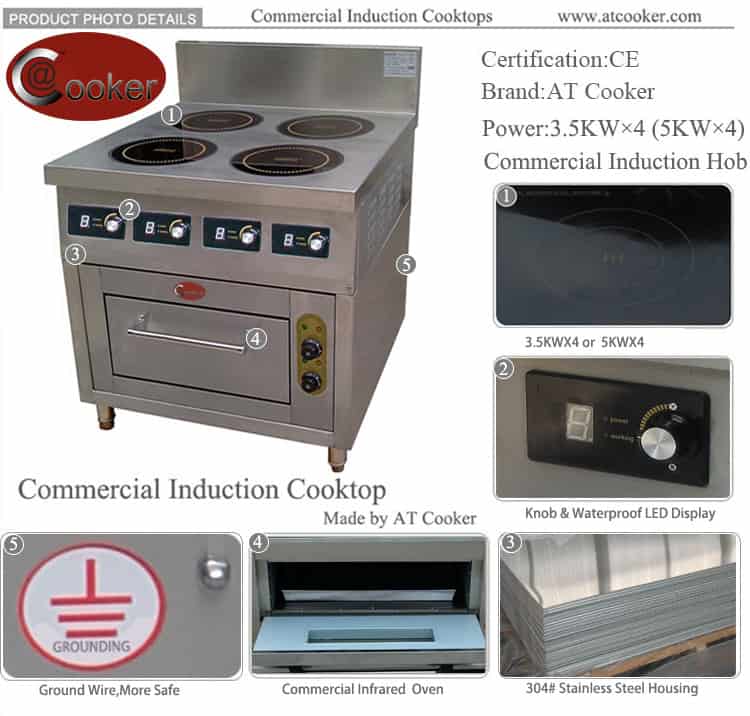
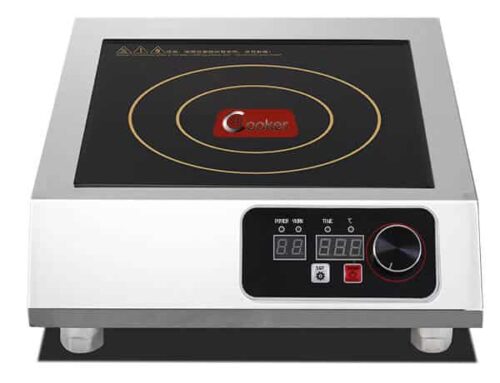
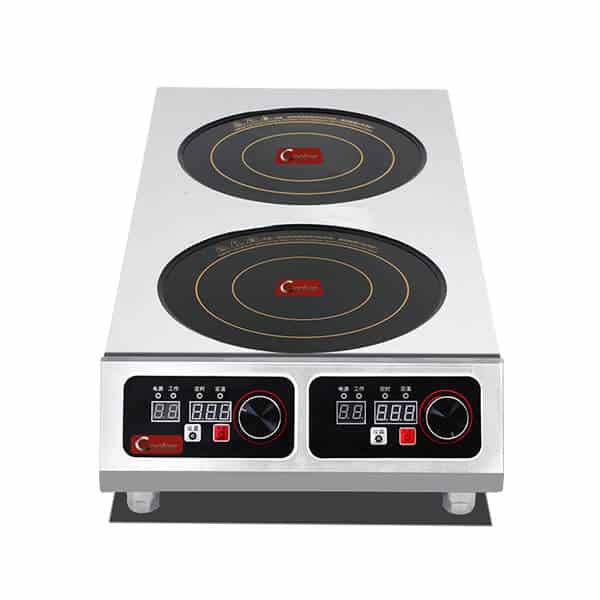
1. Commercial Induction Hob Dimensions: 24–36 Inches Wide (AT Cooker’s 31.5-Inch Model)
Standard commercial induction hobs range from 24 to 36 inches in width, and AT Cooker’s BZT-AZH4FO fits perfectly in this sweet spot. Its hob section measures 800mm (31.5 inches) wide—wide enough to fit four independent burners (each 300mm/11.8 inches in diameter) but compact enough for most commercial countertops (which typically range from 30 to 36 inches deep).
The four-burner layout is designed for multitasking: you can simmer sauces on one burner, sauté veggies on another, and boil water on the third—all while using the fourth for high-heat searing. “The 31.5-inch width was perfect for our 32-inch countertop,” said Hansin Kim, a restaurant owner who uses the BZT-AZH4FO. “We didn’t have to cut extra space, and the four burners let us cook four dishes at once—saving 30 minutes per service.”
Each burner has 8 power levels (from 3.5KW to 5KW), so you can adjust heat precisely—something critical for delicate tasks like melting chocolate or cooking dairy-based sauces. The hob’s surface is made of 6mm tempered glass, which is scratch-resistant and easy to wipe clean between uses.
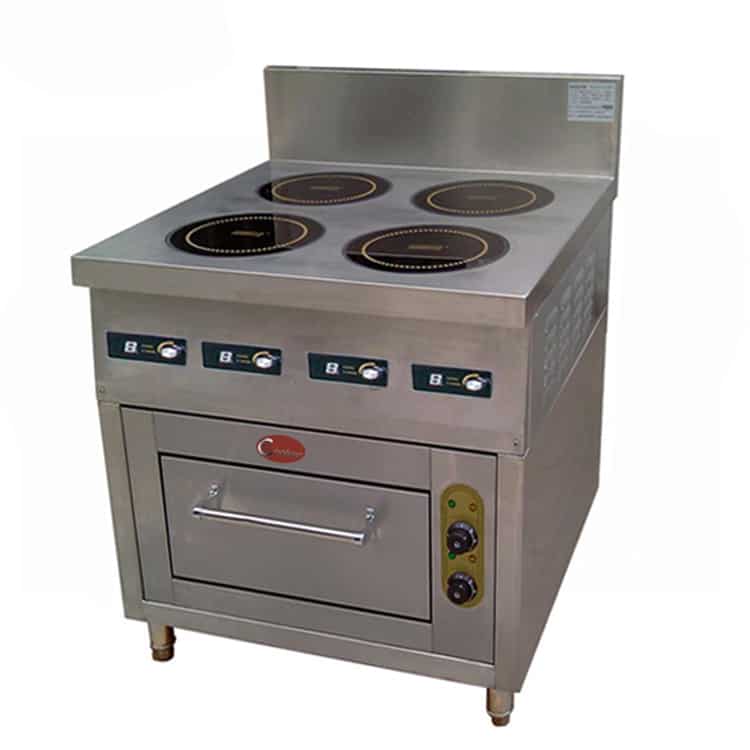
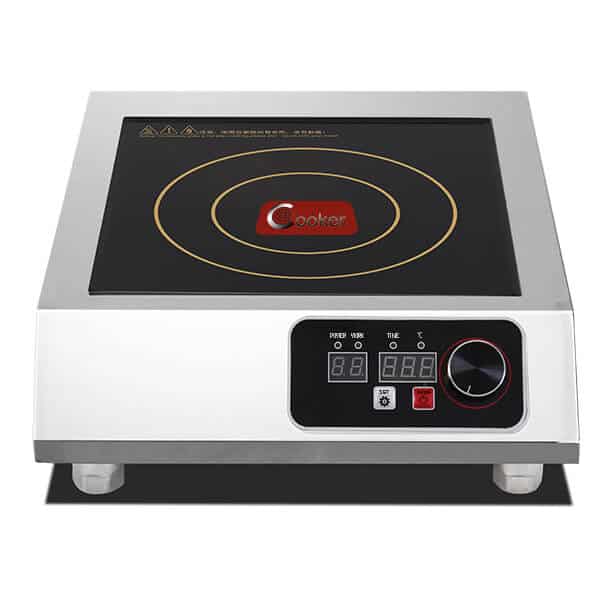
2. Oven Dimensions: 38L Capacity (Built-In for Space Savings)
Built-in commercial ovens typically range from 24 to 30 inches wide, but AT Cooker’s BZT-AZH4FO takes a space-saving approach: its oven is embedded directly below the induction hob, with an internal capacity of 38L. This eliminates the need for a separate freestanding oven, freeing up valuable floor space in small to mid-size kitchens.
The oven’s external dimensions (integrated with the hob) are 800×880×(800+200)mm (width×depth×height)—the “+200mm” accounts for the oven’s upper section that connects to the hob. The internal oven cavity fits standard 12×18-inch baking trays, and it has two layers (one pan per layer) for simultaneous cooking. For example, you can bake bread on the lower layer and roast veggies on the upper layer without flavor transfer.
Unlike standalone convection oven induction cooktop models that take up 2–3 square feet of floor space, the BZT-AZH4FO’s built-in design uses vertical space instead. A café owner in London noted: “We only have a 100-square-foot kitchen—this combo unit saved us from buying a separate oven and hob, which would have taken up half the space.”
3. Overall Unit Dimensions: Perfect for Commercial Countertops
To ensure the BZT-AZH4FO fits your kitchen, here’s a detailed breakdown of its overall dimensions (including packaging for delivery planning):
| Component | Dimensions (mm) | Dimensions (Inches) | Key Notes |
|---|---|---|---|
| Product (Hob + Oven) | 800×880×1000 (W×D×H) | 31.5×34.6×39.4 | H includes 200mm oven extension |
| Packaging | 900×980×1150 (W×D×H) | 35.4×38.6×45.3 | For delivery/ storage planning |
| Each Hob Burner | 300 (Diameter) | 11.8 | Fits pots/pans ≥12 inches |
| Oven Capacity | 38L Internal | 2.3 Cu Ft | Accommodates 2×12×18-inch trays |
| Storage Cabinet (Under Hob) | 750×800×300 (W×D×H) | 29.5×31.5×11.8 | For pots, pans, or utensils |
The unit also includes a built-in storage cabinet under the hob (750×800×300mm), which is a huge plus for small kitchens. “We use the cabinet to store our induction-compatible pots and pans,” said a hotel kitchen manager. “It keeps the countertop clear and makes everything easy to reach.”
4. Installation Requirement: Flat, Stable Countertop Surface
Your induction stove and oven needs a flat, stable countertop to perform properly—and the BZT-AZH4FO is no exception. The countertop must be:
- Level within ±1mm per meter: Uneven surfaces cause the hob to rock, which can tip pots or affect oven door alignment.
- Sturdy enough to support 120kg: The BZT-AZH4FO weighs 120kg (265lbs) when fully assembled—so concrete, granite, or reinforced wood countertops are ideal. Avoid laminate or tile countertops with loose grout, which can crack under weight.
- Minimum thickness of 30mm: Thin countertops (≤20mm) may bend over time, especially with heavy pots on the hob.
AT Cooker recommends using a spirit level to check flatness before installation. If your countertop is slightly uneven, our installation team can add shims to level the unit—this takes 10–15 minutes and is included in our professional installation service.
Pro Tip: If you’re installing the BZT-AZH4FO on a new countertop, ask your contractor to reinforce the area with steel brackets. This adds extra support and prevents sagging over years of use.
5. Electrical Requirements: Dedicated 220–240V (or 380V) Circuit
Induction units draw more power than traditional gas hobs, so the BZT-AZH4FO requires a dedicated electrical circuit to avoid overloads. The exact voltage depends on your region:
- North America: 220–240V, 3-phase (for 3.5KW×4 burners = 14KW total power).
- Europe/Asia/Australia: 380V, 3-phase (for 5KW×4 burners = 20KW total power).
The circuit must be rated for 50A (minimum) to handle peak power use—this is non-negotiable, as undersized circuits will trip breakers during busy services. “We made the mistake of using a 30A circuit at first,” said a diner owner in Texas. “The hob kept tripping the breaker during lunch rush. AT Cooker’s electrician upgraded us to 50A, and we haven’t had an issue since.”
The unit also requires a visible disconnect switch (within 6 feet of the hob) for emergency power cutoff—this meets NEC (U.S.) and CE (EU) safety standards. Our commercial induction hob and oven comes with a 2-meter power cord, but we recommend extending it only with 6AWG copper wire (rated for high current) if needed.
6. Clearance Requirements: Prevent Overheating
Proper clearance around your induction stovetop and oven is critical to prevent overheating and ensure safe operation. The BZT-AZH4FO has specific clearance rules:
- Side Clearance: 150mm (6 inches) from adjacent cabinets or walls. This lets air circulate around the hob and prevents heat damage to wood or plastic surfaces.
- Rear Clearance: 200mm (8 inches) from the back wall. This space is needed for the power cord and ventilation vents.
- Above the Hob: 750mm (30 inches) from the bottom of an exhaust hood (if installed). This ensures the hood can capture heat and odors effectively.
- Oven Clearance: 100mm (4 inches) from the floor to the bottom of the oven. This prevents dust buildup and helps with maintenance access.
These clearances aren’t just for safety—they also improve performance. A catering company in Florida ignored the rear clearance and had to clean dust from the oven vents every week: “We placed the unit too close to the wall, and dust built up fast. After moving it to 8 inches, we only clean the vents once a month.”
7. Built-In Cutout Dimensions (If Required)
While the BZT-AZH4FO is designed to sit on top of countertops (no cutout needed for most installations), some kitchens prefer to built it into cabinetry for a seamless look. If you choose this option, the cutout must match these exact dimensions:
- Width: 780mm (30.7 inches) – 20mm less than the unit’s width to allow for ventilation.
- Depth: 860mm (33.9 inches) – 20mm less than the unit’s depth to fit the cabinet.
- Height: 980mm (38.6 inches) – 20mm less than the unit’s height to account for the oven’s upper lip.
We recommend having a professional cabinet maker cut the opening—AT Cooker can provide a detailed cutout template upon request. “Our cabinet maker used AT Cooker’s template, and the unit fit perfectly,” said a café owner in Paris. “No gaps, no rework—saved us a week of delays.”
8. Professional Installation: Mandatory for Warranty Validity
AT Cooker’s warranty for the BZT-AZH4FO is only valid if installation is done by a licensed electrician or our professional installation team. This is because improper wiring or leveling can damage the unit and create safety hazards—something we’ve seen too often with DIY installs.
Our installation service includes:
- Inspecting the countertop for stability and flatness.
- Running the dedicated electrical circuit (if not already in place).
- Leveling the unit and securing it to the countertop (with anti-slip pads).
- Testing the hob burners and oven for proper function.
- Providing a 30-minute training session for your staff (on power levels, oven functions, and cleaning).
The service costs $150–$200 (depending on location) and takes 2–3 hours to complete. “We used AT Cooker’s install team, and they caught a wiring issue our electrician missed,” said a hotel manager in New York. “It would have voided our warranty if they hadn’t fixed it—worth every penny.”
9. Ventilation: Exhaust Hood Recommended
While the BZT-AZH4FO’s induction hob doesn’t produce open flames (unlike gas hobs), it still generates heat and cooking odors—so a ventilation system or exhaust hood is strongly recommended. We suggest a hood with a minimum airflow of 400 CFM (cubic feet per minute) to capture heat from the hob and oven.
The hood should be installed 750mm (30 inches) above the hob—this is the optimal height for capturing fumes without blocking access to the burners. For kitchens without existing hoods, AT Cooker offers a compatible 400 CFM exhaust hood as an optional accessory. “The hood keeps our kitchen cool,” said a restaurant owner in California. “Before, the air above the hob got so hot our staff had to wear fans—now it’s comfortable even during dinner rush.”
“We were worried about ventilation in our small kitchen, but AT Cooker’s recommended hood fit perfectly above the induction hob. It’s quiet, and it removes all the cooking smells—our customers no longer smell food when they walk in. Plus, the hood’s design matches the hob’s stainless steel body—looks great!” — Maria, Bistro Owner
10. Leveling: Essential for Optimal Performance
Leveling your induction stove and oven isn’t just about stability—it also affects cooking performance. An uneven hob can cause pots to slide, and an unlevel oven can lead to uneven baking (e.g., cake layers rising more on one side).
The BZT-AZH4FO has four adjustable feet (one at each corner) that let you fine-tune the level. Our install team uses a digital level to ensure precision (±0.5mm per meter), but you can check it yourself with a spirit level:
- Place the level on the hob surface (crosswise and lengthwise) to check for flatness.
- Adjust the feet (using a wrench) until the bubble is centered in both directions.
- Check the oven door: it should close evenly without gaps—if not, adjust the feet slightly.
We recommend checking the level every 6 months, as heavy use can shift the unit slightly. A bakery owner in Chicago noted: “We forgot to level the oven, and our croissants were lopsided for a week. After adjusting the feet, they’re perfect every time.”
11. Access for Maintenance & Power Supply
When planning installation, leave enough space for maintenance—you’ll need to access the back of the unit for occasional repairs (e.g., replacing a burner or oven heating element). We recommend:
- Leaving 300mm (12 inches) of space behind the unit if it’s placed against a wall. This lets technicians reach the power cord and internal components.
- Ensuring the power supply is easily accessible (not hidden behind cabinets) for quick disconnects during service.
The BZT-AZH4FO’s oven has a removable back panel, which simplifies maintenance—technicians don’t need to move the entire unit to access internal parts. “Our oven heating element failed after 18 months,” said a catering company owner. “The technician accessed it through the back panel, and the repair took 45 minutes—we were back to baking by lunch.”
12. Freestanding vs. Built-In: Space Considerations
While the BZT-AZH4FO is designed for countertop/built-in installation, some kitchens use it as a freestanding unit (with a rolling cart). If you choose this option, you’ll need extra space:
- The cart must be at least 850×900mm (33.5×35.4 inches) to fit the unit with clearance.
- You’ll need 500mm (20 inches) of space around the cart for ventilation and access.
- The cart must have locking wheels to prevent the unit from moving during use.
Freestanding setups are popular with food trucks or pop-up kitchens—“We use the BZT-AZH4FO on a rolling cart in our food truck,” said a vendor in Texas. “It’s easy to move, and the locking wheels keep it stable even when we’re driving.”
AT Cooker Suggestions
Before installing your induction stove and oven, take three critical steps: first, measure your countertop space (width, depth, and thickness) to ensure it matches the BZT-AZH4FO’s dimensions. Second, have an electrician test your electrical panel to confirm it can handle a 50A dedicated circuit. Third, plan for ventilation—install an exhaust hood if you don’t have one, as it will improve kitchen comfort and extend the unit’s lifespan.
AT Cooker’s team is here to help with every step: we can send you a detailed dimension template, connect you with local licensed electricians, and even provide a 3D kitchen layout tool to visualize the unit in your space. Whether you’re a small café needing a space-saving induction cooker and oven or a hotel needing multiple units, we’ll ensure your installation goes smoothly.
Don’t let incorrect dimensions or wiring delay your kitchen setup—reach out via the form below to get a personalized installation plan and a copy of our BZT-AZH4FO dimension guide.
Get Induction Stove and Oven Installation Support
Share your kitchen’s space and electrical details, and we’ll send you a custom installation plan, dimension template, and latest pricing for the AT Cooker BZT-AZH4FO.