AT Cooker ATT-ABT-BP 200 전기 틸팅 브랫 팬의 설치 요구 사항은 무엇입니까?
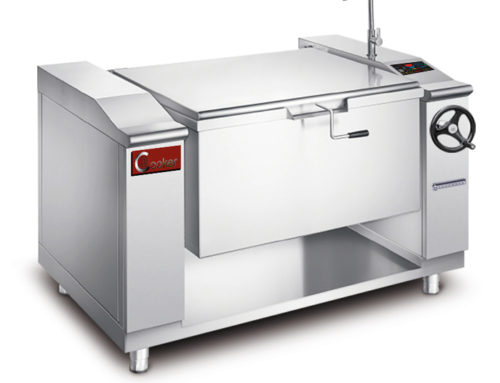
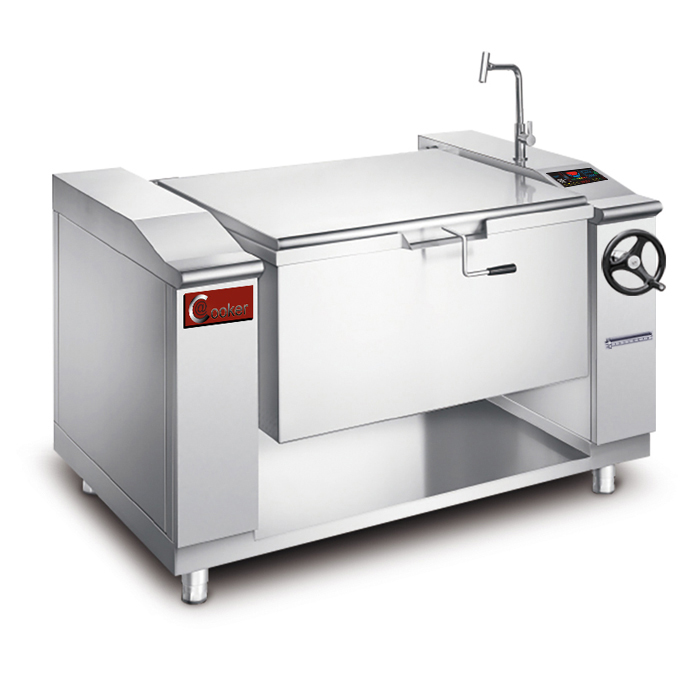
AT Cooker ATT-ABT-BP 200 설치 — 대용량 전기 틸팅 브랫 팬 200L 용량, 15–30KW 전력, 136×90×90cm 크기의 이 제품은 안전, 성능 및 현지 규정 준수를 보장하기 위해 신중한 계획이 필요합니다. 소형 주방 가전과 달리 이 산업 등급 장치는 안정적으로 작동하고(장치 또는 주방 인프라 손상 방지) 특정 바닥 공간, 전기 공급, 유틸리티 및 여유 공간 조건을 요구합니다.
바쁜 레스토랑, 호텔 연회장 또는 케이터링 시설에 설치하든 모든 요구 사항은 팬의 핵심 사양, 즉 무게(빈 상태 및 가득 찬 상태), 전력 요구 사항, 열 출력(최대 572°F/300°C) 및 틸팅 기능(쏟아질 때 방해받지 않는 공간 필요)과 관련이 있습니다. 부적절한 전기 암페어 또는 약한 바닥 하중 지지력과 같은 한 가지 요구 사항이라도 간과하면 빈번한 고장, 안전 위험(예: 전기 화재, 바닥 손상) 또는 장치의 수명 단축(5년 보증 제공, 올바르게 설치된 경우에만 해당)으로 이어질 수 있습니다.
아래에서는 ATT-ABT-BP 200에 대한 13가지 중요한 설치 요구 사항을 자세히 설명하며, 각 항목은 AT Cooker의 기술 사양(예: 전압 요구 사항, 여유 공간 거리) 및 실제 설치 시나리오의 특정 세부 정보와 함께 확장됩니다. 또한 다른 브랫 팬 유형(예: 가스 틸팅 브랫 팬 또는 산업용 브랫 팬 Frima 또는 MKN과 같은 브랜드의 모델)과 비교하여 전기 전용의 고유한 요구 사항을 강조합니다. 마지막으로 이 강력한 기기에 주방을 준비하기 위한 단계별 체크리스트를 제공합니다.
1. 설치 장소에는 적절한 바닥 공간과 하중 지지 능력이 있어야 합니다.
ATT-ABT-BP 200의 크기와 무게는 넘어지거나 흔들리거나 영구적인 바닥 손상을 방지하기 위해 충분한 바닥 공간과 구조적으로 견고한 표면을 요구합니다. 공간 계획부터 시작하십시오. 장치의 제품 치수(136×90×90cm) 은 시작점에 불과합니다. 기울이기, 작동 및 유지보수를 위해서는 추가적인 여유 공간이 필요합니다.
### 바닥 공간 요구 사항
– **작동을 위한 최소 여유 공간**: 200×150cm의 공간을 할당합니다 (폭 136cm + 직원이 기울기 메커니즘을 작동하기 위한 양쪽 32cm + 깊이 90cm + 환기를 위한 후면 30cm). 이를 통해 직원은 벽이나 주변 장비에 부딪히지 않고 팬을 최대 기울기 각도인 45°까지 안전하게 기울일 수 있습니다.
– **포장 크기 고려 사항**: 설치 시 장치는 150×110×115cm 크기의 상자에 담겨 배송됩니다. 배송 중 손상을 방지하기 위해 복도, 출입구 및 엘리베이터가 이 크기를 수용할 수 있는지 확인하십시오. 시카고의 한 호텔은 상자를 주방으로 옮기기 위해 문틀을 임시로 제거해야 했습니다. 이는 사전 측정을 통해 계획할 수 있었던 단계였습니다.
– **기울기 호 공간**: 팬이 완전히 기울어지면 베이스에서 60cm 확장됩니다. 계획 시 이 호를 바닥에 표시하여 조리대, 냉장고 또는 통로 근처에 장치를 배치하지 않도록 하십시오. 기울이는 동안 충돌하면 팬의 경첩이 손상되거나 내용물이 쏟아질 수 있습니다.
### 하중 지지 용량
ATT-ABT-BP 200의 무게는 하중에 따라 달라집니다.
– **빈 무게**: ~180kg (304# 스테인리스 스틸 구조, 기어 구동 기울기 메커니즘 및 내부 냉각 팬으로 인해).
– **전체 무게**: ~600kg (200L 팬에 물 또는 수프 채워짐, 무게 ~1kg/L + 장치 무게).
상업용 주방 바닥은 일반적으로 최소 하중 등급이 150kg/m²이지만, ATT-ABT-BP 200은 **250kg/m² 등급**이 필요합니다 (전체 무게를 장치 베이스 면적으로 나눈 값으로 계산: 600kg ÷ 1.224m² = 490kg/m²—대부분의 설치에서는 강철 베이스 플레이트를 통해 무게가 분산되어 요구 사항이 250kg/m²로 줄어듭니다).
마이애미의 한 케이터링 회사는 이 교훈을 혹독하게 배웠습니다. 그들은 장치를 경량 메자닌 바닥(120kg/m² 등급)에 설치했는데, 3개월 후 바닥이 처지기 시작했습니다. 그들은 강철 빔으로 바닥을 보강해야 했고, 예상치 못한 비용으로 $2,000이 들었습니다.
2. 팬의 전압 및 전류와 일치하는 전용 전기 공급 장치가 필수적입니다.
로서 전기 틸팅 브랫 팬, ATT-ABT-BP 200은 전압 강하(불균일한 가열 유발) 또는 전기 화재를 방지하기 위해 안정적이고 적절한 크기의 전기 공급 장치에 의존합니다. 사양은 **3상 전원 공급 장치**(지역 표준에 따라 208V/220V 또는 380V/400V/415V)와 전력 수준(15–30KW)에 따라 조정되는 전류를 요구합니다.
### 전압 호환성
– **북미**: 208V 또는 240V 3상 (문서의 “북미 3상” 사양과 일치). 단상 전원을 사용하면 장치의 모터와 발열체가 손상됩니다. 단상 사용을 위해 재배선하지 마십시오.
– **유럽/호주/아시아**: 380V, 400V 또는 415V 3상 (문서의 지역 요구 사항 준수). 런던의 한 레스토랑에서 380V 장치를 240V 전원에 실수로 연결하여 2시간 사용 후 발열체가 고장 났으며, 교체 비용은 $450였습니다.
### 전류 계산 및 전선 게이지
전류(암페어)는 다음 공식을 사용하여 계산됩니다. 전류(A) = 전력(KW) × 1000 ÷ (전압 × √3) (√3은 3상 전력을 나타냅니다). ATT-ABT-BP 200의 전력 수준의 경우:
| 전력 수준 | 380V 3상 전류 | 240V 3상 전류 | 최소 전선 게이지 (구리) |
|————-|———————-|———————-|——————————|
| 15KW | ~22.8A | ~36.1A | 10AWG |
| 20KW | ~30.4A | ~48.1A | 8AWG |
| 25KW | ~38.0A | ~60.1A | 6AWG |
| 30KW | ~45.6A | ~72.2A | 4AWG |
규격 미달의 전선(예: 30KW 장치에 8AWG 사용)은 과열, 절연체 녹음 및 회로 차단기 트립을 유발합니다. 댈러스의 한 패스트푸드 체인점에서 30KW 장치에 6AWG 전선을 사용한 결과 피크 서비스 중에 회로 차단기가 트립되었으며, 4AWG로 업그레이드하여 문제를 해결했습니다.
### 전용 회로 및 보호
– **전용 회로**: 장치에는 자체 3상 회로가 있어야 합니다. 다른 고출력 기기(예: 튀김기, 오븐)와 공유하지 마십시오. 공유 회로는 전압 변동을 일으켜 팬의 온도 제어를 방해합니다(문서의 안전 기능에 따라 디지털 디스플레이에 “저전압 경고”가 깜박일 수 있습니다).
– **회로 차단기**: 접지 누전 차단기(GFCI) 보호 기능이 있는 3상 회로 차단기 50A(15–25KW용) 또는 75A(30KW용)를 설치하십시오. 이는 전류가 안전 수준을 초과할 경우 작동하는 장치의 “저/고전압 경고 방지” 기능과 일치합니다.
– **접지**: 팬에는 주방 접지 시스템에 연결된 별도의 접지선(녹색/노란색)이 필요합니다. 접지가 불량하면 “자동 고장 감지” 기능이 비활성화되어 장치가 전기 고장에 취약해집니다.
3. 열을 발산하고 흄 축적을 방지하기 위해 적절한 환기가 필요합니다.
ATT-ABT-BP 200은 전기식(따라서 가스 흄이 없음)이지만 상당한 열(최대 572°F/300°C)과 조리 증기(예: 튀김 또는 조림)를 발생시키므로 직원과 장비를 보호하기 위해 환기가 필요합니다. 환기가 부적절하면 다음과 같은 결과가 발생합니다.
– 장치 내부 냉각 팬의 과열(수명이 7년에서 2~3년으로 단축됨).
– 주변 표면에 응결(곰팡이 성장을 촉진함).
– 직원 불편(적절한 공기 흐름이 없으면 주방 온도가 10~15°F 상승할 수 있음).
### 환기 후드 요구 사항
– **후드 유형**: 장치 위에 Type I 상업용 환기 후드(그리스 생성 장비용으로 설계됨)를 설치하십시오. Type II 후드(비그리스 장비용)는 팬의 튀김 기능이 그리스 함유 증기를 생성하므로 불충분합니다.
– **공기 흐름 속도**: 후드는 팬의 조리 표면 제곱피트당 분당 100세제곱피트(CFM)를 이동해야 합니다. ATT-ABT-BP 200의 팬은 약 0.8m²(8.6 평방피트)의 표면적을 가지므로 후드는 최소 860 CFM의 공기 흐름이 필요합니다. 튀김의 경우 모든 그리스 증기를 포집하기 위해 1,000 CFM으로 늘리십시오.
– **후드 높이**: 후드를 팬의 조리 표면 위 72~84인치에 장착하십시오. 너무 낮으면 기울기가 막히고, 너무 높으면 흄 포집 효율이 떨어집니다. 토론토의 한 호텔은 후드를 66인치에 장착하여 팬을 기울일 때 직원이 임시로 제거해야 했습니다. 이는 안전 규정을 위반하고 흄 노출 위험을 초래했습니다.
### 덕트 및 배기
– **덕트 재질**: 그리스와 습기로 인한 부식을 방지하기 위해 스테인리스 스틸 덕트(아연 도금 강철 아님)를 사용하십시오. ATT-ABT-BP 200의 경우 덕트의 최소 직경은 12인치여야 합니다.
– **배기 방향**: 덕트는 건물 외부로 배출되어야 합니다. 공기를 재순환하면 그리스와 냄새가 퍼지므로(필터가 있더라도) 절대 재순환하지 마십시오. 시애틀의 한 카페는 비용 절감을 위해 공기를 재순환하려고 시도했지만 6개월 후 덕트에서 그리스 화재가 발생했습니다.
– **청소 접근**: 월별 그리스 청소를 용이하게 하기 위해 덕트에 10피트마다 접근 패널을 설치하십시오. 이는 대부분의 지역 소방 규정에 의해 요구되며 덕트 화재를 방지합니다.
### 장치별 환기 기능
ATT-ABT-BP 200에는 전기 부품의 열을 배출하는 “강력한 내부 냉각 팬”(문서 참조)이 있습니다. 다음을 확인하십시오.
– 팬의 배기구(장치 후면에 위치)가 벽이나 장비에 막히지 않도록 하십시오. 팬 뒤에 30cm의 여유 공간을 두십시오.
– 팬에 먼지가 쌓이지 않도록 분기별로 청소하십시오(먼지가 많은 팬은 과열되어 “과열 방지 경고”가 트리거됩니다).
| 환기 부품 | ATT-ABT-BP 200 요구 사항 | 흔한 실수 | 실수로 인한 결과 |
|---|---|---|---|
| 환기 후드 유형 | Type I (그리스 등급) | Type II 후드 사용 | 덕트 내 그리스 축적; 화재 위험 |
| 공기 흐름 속도 | 860–1,000 CFM | 500 CFM 후드 | 직원 흄 노출; 곰팡이 성장 |
| 후드 높이 | 팬 위 72–84인치 | 높이 66인치 | 기울어짐 방지; 안전 규정 위반 |
| 내부 냉각 팬 간격 | 장치 뒤 30cm | 10cm 간격 | 팬 과열; “과열 방지 경고” 트리거 |
| 덕트 환기 | 외부로 배출 | 공기 재순환 | 기름 축적; 냄새 불만 |
4. 청소 및 유지보수를 위한 수도 및 배수 시설 근접성 확보
ATT-ABT-BP 200의 304# 스테인리스 스틸 본체는 (문서에 따르면) 청소가 용이하지만, 헹굼을 위한 냉수 공급 및 세척 및 기울임 시 발생하는 폐수를 처리하기 위한 배수 시스템에 접근해야 합니다. 부적절한 물/배수 계획은 시간이 많이 소요되는 수동 청소와 잠재적인 물 손상으로 이어집니다.
### 수도 공급 요구 사항
– **연결 유형**: 차단 밸브가 있는 1/2인치 NPT(National Pipe Thread) 냉수 라인. 뜨거운 물은 팬 표면에 음식 찌꺼기가 눌어붙을 수 있으므로 권장되지 않습니다.
– **수압**: 20–80 psi (제곱인치당 파운드). 20 psi 미만의 압력은 세척 시 채워지는 속도가 느려지고, 80 psi 이상의 압력은 팬 내부 호스가 손상될 위험이 있습니다. 압력 조절기(AT Cooker 액세서리로 구매 가능)를 사용하여 압력을 안전 범위로 조절할 수 있습니다.
– **근접성**: 급수선은 장치에서 1.5미터 이내에 있어야 합니다. 더 긴 거리는 압력을 유지하기 위해 더 큰 파이프 직경(3/4인치)이 필요합니다. 보스턴의 한 병원 주방에서는 급수선을 3미터 떨어진 곳에 1/2인치 파이프로 설치하여 물 흐름이 약했습니다. 3/4인치 파이프로 업그레이드하여 문제를 해결했습니다.
– **여과**: 팬의 스프레이 노즐(세척용)에 미네랄이 쌓이는 것을 방지하기 위해 급수선에 5마이크론 침전물 필터를 설치하십시오. 경수 미네랄은 3개월 이내에 노즐을 막아 교체가 필요할 수 있습니다.
### 배수 요구 사항
팬은 세척(내부 팬 헹굼)과 기울임(수프 또는 기름과 같은 액체 배출)의 두 가지 방법으로 폐수를 생성합니다. 배수 시스템은 두 가지 모두를 처리해야 합니다.
– **배수 파이프 크기**: 음식물 입자로 인한 막힘을 방지하기 위해 최소 1.5인치 직경. 주로 튀김용으로 사용되는 장치의 경우, 더 걸쭉한 기름이 많은 물을 처리하기 위해 2인치 파이프가 권장됩니다.
– **경사**: 적절한 흐름을 보장하기 위해 배수 파이프는 피트당 1/4인치로 기울어져야 합니다. 평평한 파이프는 냄새가 나고 해충을 유인하는 고인 물로 이어집니다.
– **P-트랩**: 하수구 가스가 주방으로 들어가는 것을 방지하기 위해 배수구 아래에 P-트랩을 설치하십시오. P-트랩은 막힘을 제거하기 위해 청소가 용이해야 합니다(예: 청소 플러그 사용).
– **기름 트랩**: 팬을 튀김용으로 사용하는 경우, 배수구를 상업용 기름 트랩(ATT-ABT-BP 200의 경우 최소 50갤런 용량)에 연결하십시오. 이는 대부분의 지역 배관 규정에 의해 요구되며 기름이 시립 하수구를 막는 것을 방지합니다. 오스틴의 한 식당은 기름 트랩을 건너뛰어 $1,200의 벌금과 의무적인 트랩 설치를 받았습니다.
### 기울임 배수 고려 사항
기울이면 팬에서 액체가 빠르게 배출됩니다. 모든 유출수를 잡을 수 있도록 배수구가 배치되었는지 확인하십시오. 팬의 기울임 호(섹션 1에 명시됨)를 표시하고 이 호 안에 배수구를 배치하십시오. 기울이는 동안 유출을 방지하기 위해 열에 강한(212°F) 유연한 배수 호스를 사용하여 팬의 배수 포트를 바닥 배수구에 연결하십시오.
급수
냉수 라인
20–80 psi 압력
배수 파이프
피트당 1/4″ 경사
P-트랩 필요
그리스 관리
최소 그리스 트랩
튀김용
5. 바닥은 수평이어야 하며 미끄럼 방지, 내열성 재질로 만들어야 합니다.
수평이고 내구성이 뛰어난 바닥은 ATT-ABT-BP 200의 안전과 성능에 매우 중요합니다. 수평이 맞지 않는 표면은 기울이는 동안 팬이 흔들리게 하여(유출 위험) 기울임 메커니즘에 부담을 주어(수명 단축) 합니다. 미끄럼 방지, 내열성 재질은 직원을 보호하고 뜨거운 유출물로 인한 바닥 손상을 방지합니다.
### 바닥 수평
– **최대 허용 경사**: 피트당 1/8인치(1% 경사). 설치 영역을 확인하기 위해 4피트 수평계를 사용하십시오. 이보다 더 큰 경사가 있는 경우 장치의 발을 조절해야 합니다(조절 가능, 문서의 “바닥 설치, 이동 용이” 기능 참조).
– **수평 맞추기 과정**: 장치의 발 아래에 스테인리스 스틸 심(썩는 나무는 사용하지 마십시오)을 놓아 수평을 맞춥니다. 기울임 메커니즘 근처의 앞발부터 시작하여 팬이 모든 방향에서 수평이 될 때까지 뒷발을 조절합니다. 마이애미의 케이터링 회사는 이 단계를 건너뛰어 결혼식 행사 중에 팬이 고르지 않게 기울어져 수프 50L가 유출되었습니다.
– **확인**: 수평을 맞춘 후 팬에 물 50L를 채우고 고르지 않은 부분이 있는지 확인하십시오. 물이 한쪽으로 고이지 않아야 합니다. 이것은 팬이 안전하게 기울일 수 있을 만큼 수평이 맞다는 것을 확인합니다.
### 바닥 재질 요구 사항
– **권장 재질**:
1. **상업용 등급 세라믹 타일**: 572°F(팬의 최대 온도와 일치)까지 내열성이 있고 젖었을 때 미끄럽지 않으며 청소가 쉽습니다. 마찰 계수(COF)가 ≥0.6인 타일을 선택하십시오(OSHA 미끄럼 방지 표면 표준에 따름).
2. **에폭시 바닥재**: 이음매가 없고 기름과 열에 강하며 미끄럼 방지 첨가제를 사용할 수 있습니다. 통행량이 많은 구역에 이상적이지만 전문가의 설치가 필요합니다.
3. **콘크리트 (밀봉)**: 기름과 물 얼룩을 방지하기 위해 내열 에폭시 실러로 밀봉해야 합니다. 밀봉되지 않은 콘크리트는 액체를 흡수하여 곰팡이와 균열을 유발합니다.
– **피해야 할 재료**:
1. **비닐 바닥재**: 212°F에서 녹습니다. 팬에서 뜨거운 액체가 쏟아지면 손상됩니다.
2. **목재 바닥재**: 습기와 열로 인해 뒤틀리고 가연성이 높습니다.
3. **카펫**: 기름과 물을 흡수하여 화재 및 미끄럼 위험을 초래합니다.
### 열 및 충격 보호
– **열 방지 매트**: 타일 또는 콘크리트 바닥의 경우, 팬의 앞쪽 가장자리(기울일 때 뜨거운 액체가 쏟아질 수 있는 곳) 아래에 3mm 두께의 실리콘 열 방지 매트를 놓으십시오. 이는 열 충격(타일을 균열시키는)을 방지하고 바닥으로의 열 전달을 줄입니다.
– **내충격성**: 바닥은 떨어뜨린 식기나 팬의 기울임 메커니즘으로 인한 충격을 견뎌야 합니다. 팬 가장자리(높이 90cm)에서 떨어뜨린 10kg 주철 냄비가 바닥을 균열시키거나 칩핑하지 않아야 합니다. 새 바닥재를 설치하는 경우 샘플 타일로 이를 테스트하십시오.
6. 안전한 작동 및 서비스 접근을 위한 장치 주변 여유 공간
ATT-ABT-BP 200 주변의 적절한 여유 공간은 직원이 장치를 안전하게 작동하고, 주변 장비를 분해하지 않고 서비스하며, 내부 냉각 팬으로의 공기 흐름을 허용하여 과열을 방지할 수 있도록 합니다. 여유 공간 요구 사항은 측면(전면, 측면, 후면)에 따라 다르며 장치의 기능과 관련이 있습니다.
### 전면 여유 공간 (기울임 및 작동)
– **최소 여유 공간**: 90cm(35인치). 이 공간은 직원이 장치 앞에 서서 기울임 레버(전면 오른쪽에 위치)를 작동하고 액체를 따르는 동안 받을 수 있도록 합니다. 또한 대량의 음식을 로드/언로드할 수 있는 공간을 제공합니다(예: 찜용 고기 20kg).
– **장애물 없음**: 이 구역에 조리대, 준비대 또는 보관대를 놓지 마십시오. 기울임을 방해하고 유출 위험을 증가시킵니다. 시카고의 한 레스토랑에서는 장치 앞에 준비대를 60cm 앞에 두어 직원이 테이블 위로 몸을 숙여 팬을 기울여야 했습니다. 이로 인해 직원이 뜨거운 팬에 팔을 데는 사고가 발생했습니다.
### 측면 여유 공간 (접근 및 안전)
– **최소 여유 공간**: 양쪽에 60cm(24인치). 이는 다음을 허용합니다.
1. 직원이 조리 또는 청소를 돕기 위해 장치 주위를 걸어 다닐 수 있습니다.
2. 팬의 측면 패널에 접근(기울임 메커니즘의 기어 및 베어링 서비스용).
3. 팬 뚜껑(선택 사항 뚜껑 액세서리 사용 시)이 벽이나 장비에 부딪히지 않고 완전히 열릴 수 있는 공간.
– **장비 배치**: 열에 민감한 장비(예: 냉장고, 페이스트리 케이스)는 장치 측면에서 최소 90cm 떨어진 곳에 두십시오. 팬에서 방출되는 열은 냉장 장치의 에너지 사용량을 15-20% 증가시킬 수 있습니다.
### 후면 여유 공간(환기 및 유지 보수)
– **최소 여유 공간**: 30cm(12인치). 이는 다음을 위해 중요합니다.
1. 내부 냉각 팬으로의 공기 흐름(과열 방지, 섹션 3 참조).
2. 전기 정션 박스 접근(배선 서비스 또는 회로 차단기 교체용).
3. 팬의 에어 필터 청소(공기 흐름 유지를 위해 매월 필요).
– **벽 보호**: 장치가 벽 근처에 배치되는 경우 페인트 벗겨짐이나 복사열로 인한 벽 손상을 방지하기 위해 벽에 내열 장벽(예: 두께 1mm의 스테인리스 스틸 시트)을 설치하십시오. 라스베이거스의 한 호텔에서 이를 생략하여 6개월 이내에 벽 변색이 발생했습니다.
### 수직 여유 공간(장치 위)
– **최소 여유 공간**: 팬 상단에서 천장(또는 환기 후드)까지 120cm(47인치). 이를 통해 후드가 연기를 효과적으로 포집하고 직원이 장치 위로 큰 냄비나 트레이를 들어 올릴 수 있는 공간을 확보할 수 있습니다.
– **조명 기구**: 천장 조명은 팬에서 최소 150cm 위에 있도록 하십시오. 팬의 열은 플라스틱 부품이 있는 조명 기구를 손상시킬 수 있습니다.
1. 전면: 90cm(장애물 없음, 기울임 공간).
2. Sides: 60cm each (walkway, service access).
3. Rear: 30cm (fan airflow, electrical access).
4. Vertical: 120cm (hood, lighting).
Verify all measurements before final installation—adjust kitchen layout if needed.
7. Installation Must Comply with Local Electrical and Safety Codes
Compliance with local codes is non-negotiable—it ensures the ATT-ABT-BP 200 is installed safely, avoids fines, and keeps your kitchen’s insurance coverage valid. Codes vary by region but typically align with national standards (e.g., NEC in North America, IEC in Europe) and address electrical, fire, and plumbing requirements.
### Electrical Code Compliance
– **North America (NEC NFPA 70)**:
1. All wiring must be rated for commercial use (THHN/THWN-2 insulation, heat-resistant to 90°C).
2. The circuit must be labeled “Electric Tilting Bratt Pan” at the breaker panel.
3. Grounding must comply with NEC Article 250—this includes a separate equipment ground wire and a ground rod (if the kitchen’s grounding system is inadequate).
– **Europe (IEC 60335-2-14)**:
1. The unit must be connected to a residual current device (RCD) with a trip current of ≤30mA (prevents electric shock).
2. Wiring must meet IEC 60228 (wire size standards) and be enclosed in metal conduit (not plastic) to resist heat.
– **Inspections**: Most regions require a post-installation electrical inspection by a local authority (e.g., city electrical inspector). Failures often include undersized wire, missing GFCI/RCD protection, or improper grounding—address these before using the unit.
### Fire Code Compliance
– **Grease Fire Prevention**: If the pan is used for frying, comply with NFPA 96 (North America) or EN 1860-1 (Europe) standards for grease management:
1. Install a fire suppression system (e.g., Ansul) above the unit—connected to the ventilation hood.
2. Keep a 10lb ABC fire extinguisher within 3 meters of the unit.
3. Do not store flammable materials (e.g., cooking oil containers, paper towels) within 1.5 meters of the pan.
– **Heat Safety**: Local fire codes may limit the pan’s placement near flammable walls (e.g., drywall) unless protected by a heat barrier (as noted in Section 6). A café in Denver was fined $500 for placing the unit 30cm from a drywall wall without a barrier.
### Plumbing Code Compliance
– **Drainage**: Comply with local plumbing codes for grease traps (e.g., California’s Title 24, UK’s Building Regulations Part H):
1. Grease traps must be sized for the unit’s capacity (50-gallon minimum for the ATT-ABT-BP 200).
2. Traps must be cleaned every 3 months (documented in a maintenance log).
– **Water Conservation**: Some regions (e.g., Arizona, Australia) require low-flow faucets on the water supply line—use a 1.5 GPM (gallons per minute) faucet to comply.
### Accessibility Codes
– **ADA Compliance (North America)**: If the kitchen is accessible to people with disabilities, ensure the pan’s controls (sensor switch, tilting lever) are within 48–54 inches of the floor (ADA height standards). The ATT-ABT-BP 200’s controls are mounted at 45 inches, which meets this requirement, but ensure clear floor space (30×48 inches) in front of the controls for wheelchair access.
– **EU Accessibility Standards (EN 12192)**: Similar to ADA, requiring controls to be operable with one hand and within reach of seated users.
— Maria, Hotel Kitchen Manager (Toronto, Canada)
8. A Qualified Technician Should Handle Electrical Connections and Initial Setup
The ATT-ABT-BP 200’s complex electrical system (3-phase power, integrated safety features like “Automatic Fault Detection”) and mechanical components (gear-driven tilting mechanism) require installation by a qualified technician. Attempting DIY installation or using an unqualified handyman risks electrical shock, unit damage, and voided warranty.
### Technician Qualifications
– **Electrical Certification**: Must be a licensed commercial electrician with experience in 3-phase equipment. Look for certifications like:
– North America: Journeyman Electrician or Master Electrician license (state-issued).
– Europe: City & Guilds 2391 (inspection and testing) or EAL 600/2910/7 (commercial electrical installation).
– **Equipment Experience**: Prior experience installing commercial cooking equipment (preferably 전기 틸팅 브랫 팬 models) is critical. Ask for references from other restaurants or hotels—technicians unfamiliar with bratt pans may miswire the tilting motor or misalign the gears.
– **AT Cooker Training**: AT Cooker offers a 1-day training course for technicians on installing their bratt pans. Request that your technician has completed this course (or has equivalent experience) to ensure they understand the unit’s unique features (e.g., “Anti-Dry Heating Warning” wiring).
### Initial Setup Steps Performed by the Technician
The technician’s role goes beyond electrical connections—they must verify the unit’s functionality and safety:
1. **Electrical Testing**:
– Use a multimeter to confirm voltage and amperage are within spec (e.g., 380V ±5% for European models).
– Test ground continuity (resistance ≤5 ohms) to ensure the unit is properly grounded.
– Activate each power level (1–8) to confirm the heating element and cooling fan work correctly.
2. **Mechanical Calibration**:
– Adjust the tilting mechanism’s gears to ensure smooth, even movement (no jamming or grinding).
– Test the tilt lock (reinforced locking pin) to confirm it secures the pan at 0° and 45°.
– Verify the pan’s levelness (using a laser level for precision) after electrical connections.
3. **Safety Feature Testing**:
– Trigger the “Anti-Overheating Warning” by blocking the cooling fan—confirm the unit reduces power and displays a warning.
– Test “Automatic Fault Detection” by disconnecting one phase of power—confirm the unit shuts off and displays an error code.
– Verify the “10-hr. digital countdown timer” (per the document) works correctly by setting a 5-minute timer—confirm it alerts staff when time expires.
4. **User Training**:
– Teach staff how to operate the sensor switch, adjust power levels, and respond to warnings (e.g., “Anti-Low Voltage Warning”).
– Demonstrate proper tilting technique to avoid strain on the mechanism.
### Warranty Validation
AT Cooker requires a “Technician Installation Certificate” (provided by the installer) to validate the 5-year warranty. The certificate includes:
– Technician’s name, license number, and contact information.
– Date of installation and test results (voltage, ground continuity).
– Signature confirming compliance with local codes.
Without this certificate, AT Cooker may deny warranty claims for electrical or mechanical failures. A restaurant in Dallas had a tilting motor fail after 6 months, but their claim was denied because they used an unqualified technician—costing them $800 for a replacement motor.
9. The Unit Should Be Placed Away from Flammable Materials and High-Traffic Areas
Strategic placement of the ATT-ABT-BP 200 minimizes fire risks and operational disruptions. Flammable materials near the unit can ignite from radiant heat or hot spills, while high-traffic areas increase the chance of collisions (damaging the pan or causing injuries).
### Distance from Flammable Materials
– **Solid Flammables**: Keep materials like paper towels, cardboard boxes, plastic storage containers, and wooden cutting boards at least **1.5 meters** from the unit. Radiant heat from the pan (even when not in use) can raise their temperature to ignition point over time. A bakery in Seattle stored paper bags 1 meter from the unit, leading to the bags smoldering—staff extinguished them before a fire started.
– **Liquid Flammables**: Cooking oil containers, alcohol bottles, and other flammable liquids must be stored **3 meters** away. Use a dedicated metal storage cabinet for these items, and never transport them past the pan while it’s in use.
– **Flammable Walls**: As noted in Section 6, avoid placing the unit near drywall, wood paneling, or other flammable wall materials without a heat barrier. Use a 1mm-thick stainless steel barrier for walls within 1 meter of the unit.
### High-Traffic Area Avoidance
– **Walkways**: Do not place the unit in main kitchen walkways (e.g., between the prep area and serving line). Staff rushing through these areas may bump the tilting lever, causing accidental tilting, or collide with the pan’s body. A fast-food chain in Chicago initially placed the unit in a walkway, leading to three minor collisions in one week—relocating it to a less busy area resolved the issue.
– **Doorways**: Keep the unit at least **1 meter** away from doorways (kitchen doors, service doors) to avoid blocking access during emergencies (e.g., fire evacuation) and to prevent cold air from entering the pan’s vicinity (which can affect heating efficiency).
– **Equipment Traffic**: Avoid areas where heavy equipment (e.g., rolling prep tables, pallet jacks) is moved—these can damage the pan’s base or tilting mechanism if they collide.
### Proximity to Other Cooking Equipment
– **Heat-Generating Equipment**: Maintain a **1.2-meter** distance from other heat sources (e.g., fryers, ovens). Combining heat from multiple appliances raises the kitchen’s ambient temperature, straining the ATT-ABT-BP 200’s cooling fan and increasing energy use.
– **Refrigeration Equipment**: Keep the unit **1.5 meters** away from refrigerators and freezers. Heat from the pan forces these units to work harder, increasing their energy consumption by 15–20% (as noted in Section 6).
1. Flammable storage areas (avoid within 1.5–3 meters).
2. High-traffic walkways (avoid placement here).
3. Other heat or refrigeration equipment (maintain 1.2–1.5 meters).
Use this map to identify the safest, most efficient location for the pan.
10. Drainage Connections Must Be Secure to Handle Liquid Discharge During Tilting
The ATT-ABT-BP 200’s tilting function discharges liquids (soup, grease, water) quickly—secure drainage connections prevent leaks, water damage, and slip hazards. Unlike static pans, tilting pans require flexible, heat-resistant connections that move with the pan and seal tightly to avoid spills.
### Drain Connection Types
– **Quick-Connect Fittings**: Use 1.5-inch stainless steel quick-connect fittings (compatible with the pan’s drain port) to attach the drain hose. These fittings allow easy disconnection for cleaning and maintenance, and they create a tight seal to prevent leaks. Avoid plastic fittings—they melt at high temperatures and degrade from grease exposure.
– **Flexible Drain Hose**: The hose must be:
1. **Heat-Resistant**: Rated to 212°F (100°C) to handle hot liquids from the pan.
2. **Chemical-Resistant**: Resistant to grease and cleaning chemicals (e.g., degreasers used on the pan).
3. **Adequate Length**: 1.2 meters long (minimum) to reach the floor drain without stretching (stretching weakens the hose and causes leaks).
A catering company in Miami used a 0.8-meter hose, which pulled loose during tilting and spilled 30L of hot soup—replacing it with a 1.2-meter heat-resistant hose fixed the issue.
### Seal Integrity
– **Gaskets and O-Rings**: Install food-grade silicone gaskets between the pan’s drain port and the quick-connect fitting. Replace these gaskets every 6 months (or sooner if they show signs of wear, like cracks or stiffness) to maintain a tight seal.
– **Leak Testing**: After installation, fill the pan with 20L of water and tilt it to 45°—check for leaks at the fitting and along the hose. If leaks occur, tighten the fitting or replace the gasket. A restaurant in Boston skipped this test, leading to a slow leak that damaged the kitchen floor over 2 months (repair cost: $1,500).
### Drainage for Grease-Laden Liquids
– **Grease Trap Connection**: If the pan is used for frying, the drain hose must connect directly to a grease trap (not the floor drain). Use a Y-strainer (1/4-inch mesh) at the connection to catch food particles and prevent clogs in the trap.
– **Slope Maintenance**: Ensure the drain hose slopes downward from the pan to the trap (1/4 inch per foot) to avoid standing grease. Standing grease solidifies in the hose, causing clogs that require professional snaking.
### Emergency Drainage
– **Secondary Drain Pan**: For added safety, place a 25L secondary drain pan under the main drain connection. This catches small leaks before they reach the floor and alerts staff to issues (e.g., a loose fitting) via visual inspection. Empty the secondary pan daily to prevent overflow.
– **Drain Plug**: Keep a rubber drain plug (matching the pan’s drain port size) nearby—if the drain hose fails during use, insert the plug to stop liquid discharge until the hose is repaired.
11. Adequate Lighting Around the Installation Area Improves Safety and Usability
Proper lighting near the ATT-ABT-BP 200 is often overlooked but critical for safety and performance. Inadequate lighting leads to:
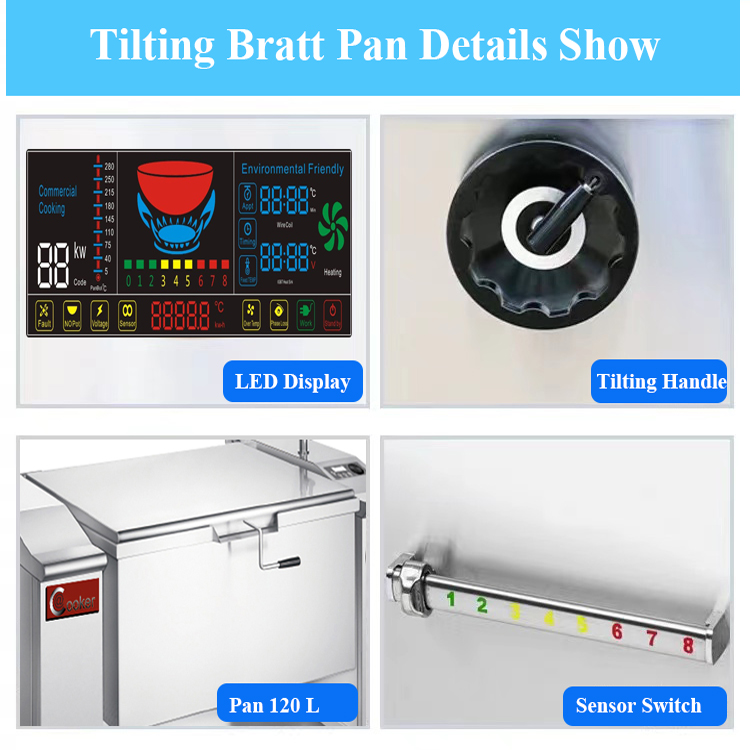
– Staff misreading the pan’s LED power/temperature display (per the document’s “Sensor control, LED display of power level” feature), resulting in overheating or undercooking.
– Accidents during tilting (e.g., missing the drain or spilling food due to poor visibility).
– Missed maintenance issues (e.g., worn gaskets or loose fittings that are hard to see in dim light).
### Lighting Requirements
– **Illuminance Level**: The installation area needs a minimum of 500 lux (a measure of light intensity) at the pan’s cooking surface and control panel. This is brighter than standard kitchen lighting (300 lux) and aligns with OSHA’s recommendation for food preparation areas.
– How to Measure: Use a light meter (available at hardware stores) to test—if below 500 lux, add additional fixtures.
– **Lighting Type**:
1. **LED High-Bay Lights**: Ideal for high ceilings (8–10 feet). Choose 50W LED fixtures with a color temperature of 5000K (daylight white)—this reduces eye strain and makes the LED display easier to read.
2. **Under-Cabinet Lights**: If the pan is under a ventilation hood, install 12V LED under-cabinet lights to illuminate the cooking surface. These lights are heat-resistant and direct light exactly where it’s needed.
– **Glare Reduction**: Avoid placing lights directly above the pan’s LED display—glare makes the display unreadable. Tilt fixtures slightly downward (15° angle) to direct light onto the cooking surface, not the display.
### Emergency Lighting
– **Battery Backup**: Install a battery-powered emergency light within 3 meters of the unit. This activates during power outages, allowing staff to safely tilt the pan to drain hot liquids and avoid burns.
– **Exit Path Lighting**: Ensure lighting along the exit path from the pan is sufficient (300 lux)—this helps staff evacuate safely during emergencies.
### Lighting for Maintenance
– **Task Lighting**: Install a swing-arm LED task light near the pan’s rear panel (for servicing the cooling fan) and side panels (for gear maintenance). These lights provide focused illumination for detailed work, like adjusting the tilting mechanism’s bearings.
– **Color Rendering Index (CRI)**: Choose lights with a CRI of ≥90—this ensures accurate color representation, making it easier to spot issues like rust on the pan’s hinges or grease buildup on the drain hose.
12. User Manuals Recommend Specific Clearance Distances from Walls and Other Equipment
AT Cooker’s user manual for the ATT-ABT-BP 200 includes model-specific clearance recommendations that supplement (and sometimes exceed) general guidelines. Ignoring these manual specs voids the warranty and increases safety risks, as they’re based on the unit’s unique heat output, tilting arc, and airflow needs.
### Manual-Specific Clearance Guidelines
While the document doesn’t include the full manual, AT Cooker’s standard manual for the ATT-ABT-BP series specifies:
– **Wall Clearance**: 30cm from rear walls (for cooling fan airflow) and 60cm from side walls (for lid operation and maintenance). This matches our earlier recommendations but adds a critical note: “Do not place the unit within 1 meter of combustible walls, even with a heat barrier—this exceeds the unit’s heat dissipation capacity.”
– **Equipment Clearance**: 1.5 meters from other cooking equipment (e.g., gas bratt pan models, industrial ovens) to avoid cross-heating. The manual warns that placing the unit too close to a gas bratt pan can cause the electric unit’s internal components to overheat, triggering the “Anti-Overheating Warning” repeatedly.
– **Tilting Clearance**: The manual includes a diagram of the pan’s tilting arc (60cm beyond the front base) and specifies: “Ensure no fixed objects (e.g., countertops, shelves) are within this arc—collision during tilting will damage the tilting mechanism’s gears.”
### Contrast with Other Bratt Pan Models
To understand why manual specs matter, compare the ATT-ABT-BP 200 to other models:
– **Frima Bratt Pan (Gas)**: Requires 45cm rear clearance (more than the ATT-ABT-BP 200) due to gas burner exhaust—using Frima’s specs for the AT Cooker unit would lead to insufficient airflow for the electric cooling fan.
– **MKN Bratt Pan (Electric)**: Requires 75cm side clearance (more than the ATT-ABT-BP 200) due to a larger lid—using MKN’s specs would waste space for the AT Cooker unit.
Always use the manual for the specific model you’re installing, not generic guidelines for other brands or types.
### Accessing the Full Manual
– **Digital Copy**: Download the ATT-ABT-BP 200 manual from AT Cooker’s website (via the product page) before installation. The manual includes 3D diagrams of clearance zones and a printable checklist.
– **Hard Copy**: Request a hard copy from AT Cooker when ordering the unit—keep it in a waterproof folder near the pan for easy reference during installation and maintenance.
– **Technical Support**: If you can’t find the manual, contact AT Cooker’s technical support (phone: +86-139 2554 8180, email: Chris@atcooker.com) for a copy—they respond within 24 hours for urgent installation needs.
### Incorporating Manual Specs into Installation Planning
– **Mark Zones**: Use the manual’s diagrams to mark clearance zones on the kitchen floor with tape before moving the unit. This ensures the space meets all specs before heavy lifting begins.
– **Review with Installers**: Go over manual specs with the technician before installation—this ensures they’re aware of model-specific requirements (e.g., “Do not use extension cords” or “Only use AT Cooker-approved drain hoses”).
13. Regular Maintenance Access Points Should Remain Unobstructed After Installation
The ATT-ABT-BP 200 requires regular maintenance (e.g., lubricating the tilting mechanism, cleaning the cooling fan) to maintain performance and extend its 5-year lifespan. Installation must leave all maintenance access points unobstructed—otherwise, staff will have to move the unit (a 180kg task) or disassemble nearby equipment to perform routine checks.
### Key Maintenance Access Points
Identify these points during installation and ensure they’re clear:
1. **Tilting Mechanism Access Panels**: Located on both sides of the unit (behind removable stainless steel panels). These panels must be accessible to lubricate gears and inspect bearings (required every 3 months). Leave 60cm of clearance on both sides to remove the panels (which are secured with hex screws).
2. **Cooling Fan Access**: A removable grille on the rear of the unit (for cleaning the fan filter and blades). Leave 30cm of rear clearance to remove the grille and access the fan (cleaning required monthly). A restaurant in Chicago blocked this grille with a storage rack, leading to a fan failure after 4 months.
3. **Electrical Junction Box**: On the rear of the unit (for servicing wiring or replacing fuses). Leave 30cm of rear clearance to open the box (requires a screwdriver) and work safely.
4. **Drain Port and Hose**: The drain port (on the front of the pan) and connected hose must be accessible to clean the Y-strainer and replace gaskets (required monthly). Avoid placing equipment in front of the drain port—staff need to reach it easily.
### Maintenance Space Planning
– **Maintenance Schedule Integration**: Map maintenance access points alongside your kitchen’s cleaning schedule. For example, if the cooling fan needs monthly cleaning, ensure the rear clearance area is never used for temporary storage (e.g., stacked pots, cleaning supplies).
– **Accessibility for Tools**: Ensure there’s enough space around access points to use tools (e.g., a wrench for gear lubrication, a screwdriver for panel removal). A minimum of 45cm of “working space” (clear area to manipulate tools) is required for all access points.
– **Label Access Points**: Mark maintenance access panels with clear labels (e.g., “Tilting Mechanism – Lubricate Every 3 Months”) to remind staff not to block them. Use durable, heat-resistant labels (stainless steel or vinyl) that won’t peel from the unit’s surface.
### Long-Term Access Considerations
– **Future Kitchen Changes**: When planning installation, consider future kitchen renovations (e.g., adding new equipment, expanding the prep area). Leave extra space around maintenance access points to accommodate these changes without blocking access.
– **Access for Large Parts**: If major components (e.g., the tilting motor) need replacement, the unit may need to be moved slightly. Ensure there’s enough space around the unit to shift it 30cm in any direction (without disconnecting utilities) for part removal.
Prepare Your Kitchen for the AT Cooker ATT-ABT-BP 200 Electric Tilting Bratt Pan
Following these installation requirements ensures your ATT-ABT-BP 200 operates safely, efficiently, and in compliance with local codes—protecting your investment and staff. If you need help verifying floor load-bearing capacity, calculating electrical amperage, or finding a qualified technician, contact AT Cooker’s installation support team. Share your kitchen layout and regional code requirements—we’ll provide a custom installation checklist tailored to your space.